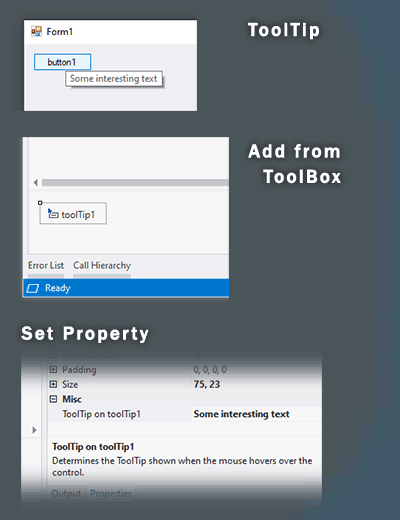
ToolTip: Windows Forms .NET

ToolTip makes interfaces more intuitive. You want to add the ToolTip control to your Windows Forms application, which provides useful contextual hints to the client. We use the Visual Studio designer to add ToolTips easily.

This C# tutorial demonstrates the ToolTip control in Windows Forms. It explains ToolTip properties.

ToolTip in Windows Forms

Add

First, to add a ToolTip control to your Windows Forms application, you need to open the ToolBox panel in Visual Studio's designer. Then, open the "All Windows Forms" pane and find ToolTip. Double-click the ToolTip icon in the panel.

Looking at the Designer tray. In the Visual Studio designer, there is a gray tray near the bottom of your Window. This area shows controls that do not appear inside your Windows Forms. Some dialog boxes you add will appear here. Your ToolTip control will appear here as well. Please see the image below.

ToolTips in Visual Studio 2008

Overview

Here we look at an overview of the ToolTip control in Windows Forms. First, many examples on ToolTips will show you the C# code to add them directly. However, this isn't necessary in many programs and will just make your code more complicated. Instead, we can use the designer to create all the ToolTips.

How you can assign ToolTips. In your Designer view in Visual Studio, each control, such as Buttons and TextBoxes, will acquire a "ToolTip on toolTip1" property when you add a toolTip1 to your designer view. You can access this property in the Properties pane to set the tool tips.

Set

Here we see how you can add a ToolTip to a Button control in Windows Forms. Let's add a Button named button1 to your Windows Forms window in the Designer.

Button

Setting the property. Click on the button1 so it is focused. It will be surrounded by the resizing boxes. Now open the Properties pane and make sure the Properties icon near the top is selected. Scroll down to the ToolTip on toolTip1 row, and add some text to it.

ToolTip on toolTip1 screenshot

Result

Next, you can run your Windows Forms application and hover your mouse over the Button control. You will see that you now have a tool tip on the button. You can apply this technique to most controls and it is ideal for rapid application development. Please see the top image.

Text

Here we look at the guidelines for writing ToolTip text in your Windows Forms application. If you have a smaller development shop, the programmers will need to write much of the text, at least at first. The "User Interface Text" guideline document at MSDN will be used next.

MSDN reference

Infotips use sentence case and ending punctuation. In other words, you want your ToolTip (also called Infotips) to be a short, grammatical, and declarative sentence. Use an ending period. Normally, you shouldn't use question marks or exclamation marks.

Note: In the first screenshot on this article, the ToolTip uses the short declarative sentence "This is the tooltip you added." This is an example of the correct way to phrase the ToolTips. Additionally, you should be consistent in capitalization. It might have been better for the ToolTip to have the word "tooltip" capitalized with Pascal case.

Modification

Steps

It is possible and sometimes useful to write ToolTip code in C# code. However, if you can avoid this it is best. Often, ToolTips that utilize IsBalloon will need to have custom C# or VB.NET code.

Important methods. The most important methods on ToolTip controls you can use in C# or VB.NET are the Show method, the Hide method, the SetToolTip method, and the GetToolTip method. First, the Show method forces the tip to be displayed. This is usually a bad design decision.

The other ToolTip methods. The Hide method forces a ToolTip to disappear. The Get and SetToolTip methods lets you assign tooltips programmatically to controls. Avoiding these methods will result in easier code to maintain and debug. Some programs may have a requirement for these methods, however.

Properties

Programming tip

Here are my notes on the properties available in the Visual Studio designer for the ToolTip control in Windows Forms. I have done work with ToolTips in C# code, but this is not usually necessary. The properties that are useful to change include the Active property, the color properties, the icon and title properties, and sometimes the balloon property.

PropertyToolTip screenshot

Active property. This allows you to specify if the ToolTip is available to be opened or shown. When you set the Active property in your C# source code, the ToolTip is not immediately shown. Instead, it is enabled to be shown later.

AutomaticDelay property. This property allows you to specify the number of milliseconds after the user hovers over the ToolTip before it is shown. This isn't worth changing in most programs. It could be useful in certain programs where accessibility is a requirement.

AutoPopDelay property. This property lets you specify how long in milliseconds a ToolTip will remain on the screen if the mouse is frozen. This property isn't useful very often and I recommend you leave it set to the default of 5 seconds. If you change the behavior here, you run the risk of having the user notice unexpected behavior and judging your program negatively.

BackColor and ForeColor property. You can set the background and foreground of your ToolTip. It is usually best to avoid changing these. If you have a serious alert to display, a ToolTip isn't the right control. However, in some cases a different shade of light blue or pink can really enhance the impression of the ToolTip.

InitialDelay property and ReshowDelay property. These attributes let you specify the exact delays in milliseconds. Normally, these are best left with their default values, as the defaults are sensible. Unless you have a very specific reason for changing these, you are probably going to hurt the usability of your program more than help it.

This section provides information

IsBalloon property. You can specify a balloon tip with this property. My experience is that balloons are poorly implemented and challenging, or impossible, to get exactly right. The balloons' positioning is unpredictable when attached to controls such as TextBox, and can end up causing you a big headache with no benefit.

StripAmpersands property. Often, globalization is implemented with ampersands. This property lets you specify if your strings contain ampersands that need to be removed. If your program does not use ampersands for globalization, using False is OK.

ToolTipIcon and ToolTipTitle property. These allow you specify an image to display on the tooltip, and a title to display. The title will be displayed in bold font at the beginning of the tooltip, on a new line. Using titles on tooltips is non-standard in most cases, so is best avoided. As always, you should carefully reference Microsoft's guidelines for user experience.

MSDN reference

UseAnimation property and UseFading property. These properties let you specify the visual effects used on your tooltips. Windows XP and Windows Vista allow users to specify animation preferences in the Control Panel. It is best to leave these to their default, so the user's preferences are always applied.

Tip: Some properties are best left unset. Others can be very useful to modify. The IsBalloon property can cause unpredictable positioning behavior.

Summary

.NET Framework information

Here we looked at how you can use ToolTips in your Windows Forms programs. Ideally, you can implement your tips entirely in the Designer, keeping all the code out of your private implementation. We looked at an example and then touched on some properties and methods of ToolTip controls.

Windows Forms .NET
.NET