StatusStrip. A StatusStrip displays window status. It is usually at the bottom of a window. We use a ToolStripStatusLabel hyperlink in the C# Windows Forms status bar.
Intro. The StatusStrip is a control in your Toolbox in Visual Studio. Double click on its icon and then it will appear in the tray at the bottom of the Visual Studio window.
Hyperlink example. Double-click on the ToolStripStatusLabel you want to turn into a hyperlink. We must use the Click event handler to make the status item do something when it is clicked.
Detail To start a web browser, we will need to use the Process.Start method in System.Diagnostics.
Tip In the new Click event handler, add the inner line here. You can directly access System.Diagnostics.
private void toolStripStatusLabel3_Click(object sender, EventArgs e)
{
// Launch Dot Net Perls website.// ... You should change the URL!
System.Diagnostics.Process.Start( "http://www.dotnetperls.com/");
}
Alignment. All of the items will be squished to the left of the status strip by default. We can change this, and right-align a label.
Detail To right-align things on a StatusStrip we add a "spring" in between the left and right items.
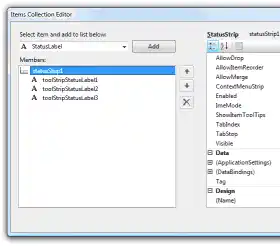
Collections. Please open the Items dialog in Visual Studio. On your StatusStrip, open the Items Collection Editor dialog in the A-Z listing.
Tip The Items Collection Editor dialog is pictured in the screenshot here. It will look different in your version of Visual Studio.
Adding items. Leave the Status Label dropdown selected and click on the big Add button. You can also add other types of controls to your status strip here.
Tip To add a hyperlink, you can use a regular status label. You can make it a hyperlink later.
Spring property. Add a ToolStripStatusLabel with "Spring" set to true. Put it after the leftmost item, and add another status label after it. This will right-align the third status label.
Finally On the right side of the Items Collection Editor dialog, you will see another grid list.
Then Scroll to Text and type in the text of your link. For a hyperlink, set the IsLink property to true.
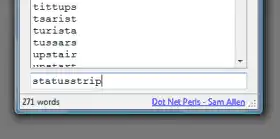
A summary. We added a StatusStrip. We used the example of a right-aligned hyperlink to show how the system works. A simple hyperlink in the status bar is good for branding.
Dot Net Perls is a collection of tested code examples. Pages are continually updated to stay current, with code correctness a top priority.
Sam Allen is passionate about computer languages. In the past, his work has been recommended by Apple and Microsoft and he has studied computers at a selective university in the United States.
This page was last updated on Sep 25, 2022 (edit).